 |
FLRig Users Manual
1.4.8
|
|
FLRig Users Manual
1.4.8
|
CAT control involves both software and settings on the radio itself. The default radio settings on the FT-991A are not likely to work “out of the box”.
Some initial things to verify are in place:
On the rig, press the MENU button. Then change these menu items as shown:
| Menu # | Name | Value |
|---|---|---|
| 31 | CAT RATE | 38400 bps |
| 32 | CAT TOT | 10 msec |
| 33 | CAT RTS | ENABLE |
| 59 | CW FREQ DISPLAY | PITCH OFFSET |
| 60 | PC KEYING | DTR |
| 62 | DATA MODE | OTHERS |
| 63 | PSK TONE | 1500 hZ |
| 64 | OTHER DISP (SSB) | 1500 Hz |
| 65 | OTHER SHIFT (SSB) | 1500 Hz |
| 66 | DATA LCUT FREQ | 300 Hz |
| 67 | DATA LCUT SLOPE | 18 dB/oct |
| 68 | DATA HCUT FREQ | 3600 Hz |
| 69 | DATA HCUT SLOPE | 18 dB/oct |
| 70 | DATA IN SELECT | REAR |
| 71 | DATA PTT SELECT | DAKY |
| 72 | DATA PORT SELECT | USB |
| 73 | DATA OUT LEVEL (RX) | 100 |
| 74 | FM MIC SELECT (PHONE) | MIC |
| 75 | FM OUT LEVEL (Rx) | 50 |
| 76 | FM PKT PTT SELECT | DTR |
| 77 | FM PKT PORT SELECT | DATA |
| 106 | SSB MIC SELECT | MIC |
| 107 | SSB OUT LEVEL | 50 |
| 108 | SSB PTT SELECT | DAKY |
| 109 | SSB PORT SELECT | USB |
| 110 | SSB TX BPF | 300-2700 |
| 114 | IF NOTCH WIDTH | NARROW |
| 146 | DATA VOX GAIN | 50 |
| 147 | DATA VOX DELAY | 100 msec |
| 148 | ANTI DVOX GAIN | 0 |
You should have already installed the driver for the built-in sound card in the FT-991A.
Connect the rig to the computer with a USB A-Male to B-Male cable and turn on the radio.
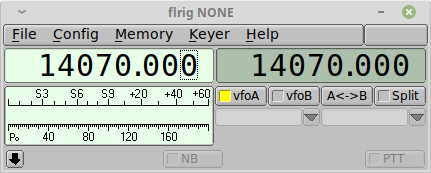
With the radio on and the USB cable connected and no other communications program running, Start flrig. It will come up with just a basic display.
Open the menu Config/Setup/Transceiver.
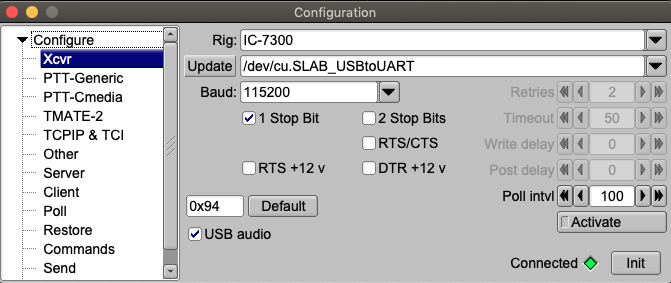
Choose the FT991A from the Rig dropdown list. That will select the default settings which will work on . Note: The RTS +12v and DTR +12v boxes do not normally need to be checked.
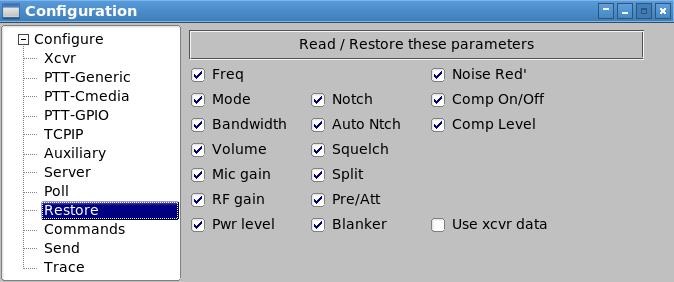
and choose whether you want flrig to save and restore all the radio’s parameters on startup and exit or whether you want it to open with the same settings as the rig is currently using. If Use xcvr data is checked flrig will start up with the same settings as the rig currently is using.

and click the Set All buttons for the initial polling options. You can play with these values later if you wish. The larger the number the slower the response time to button pushes etc, but also the less load on the system so there is a balance. A very fast machine can use all ones, but there is normally no need to add the additional load to your system for that.
I would recommend before you move on that you go to the Config/UI menu and select Tooltips. They are a great help to the new user to figure out what each control does as not all are labeled. You can choose 4 different UI’s from the narrow one with small sliders (I use this one – see above screen shot of flrig), to a narrow one with large sliders, to a wide version or a touch version. Now close flrig and restart it to be sure all is well . Everything should be working and you should be able to change frequency on the radio and flrig should follow.
Start fldigi and fill in the initial setup pages presented. You can ignore the last page for now. All these pages can be accessed via the configuration menu later to be changed as you wish. Since you've chosen to use flrig then go to the fldigi menu “Configuration/Rig control/flrig” and check the top box to tell fldigi to use flrig for rig control with fldigi as client.
Leave the other controls at their default setting.

Once that is done fldigi should communicate with flrig and changes such as frequency or bandwidth in flrig or fldigi should be reflected in the other. If the lower box is checked then flrig will send fldigi audio to the radio when the PTT button is clicked otherwise PTT will just key the rig with no power out. Click Save at the bottom of the page.
All that is left is to customize fldigi for how you want to operate. Many things can be changed such as the UI scheme, colors, Macros, and many more. Read the help manual to learn about all the options and features that are available.
With fldigi running verify you have a blue waterfall running. If you don't see that then there is a problem with the audio input to fldigi. Verify the Soundcard setup.
Note:
Now we will verify the power out of the radio. Set the radio power control on the rig to max, 100% and leave it there.
Set Power Meter scale: Right click on the lower portion of the S-meter scale and choose the power scale desired. The max digital power out used for a QSO should cause no ALC action on the radio. The FT991A will put out quite a bit of power without ALC action, but you don't want to interfere with other close signals on the band either so ideally the power should be between 25-40 watts.