 |
FLARQ Users Manual
4.3.9
|
|
FLARQ Users Manual
4.3.9
|
Fast Light Automatic Repeat reQuest is a file transfer application that is based on the ARQ specification developed by Paul Schmidt, K9PS. It is capable of transmitting and receiving frames of ARQ data via either FLDIGI or MultiPsk on Windows, or FLDIGI on Linux/Macintosh OSX. The interaction between FLARQ and FLDIGI requires no operator intervention. Program data exchange between FLARQ and FLDIGI is accomplished using a localhost socket interface. The socket interface requires that one program act as the server and the other the client. FLARQ is a client program and FLDIGI is a server program.
FLARQ will not execute unless either FLDIGI (preferred) or MultiPsk is already running on the host computer. If MultiPsk is used it must be set to the "socket" mode before executing FLARQ. If you attempt to run FLARQ without FLDIGI already running you will view an information window asking you to first start FLDIGI.
The ARQ transfer must take place between two systems both of which are running the FLARQ / FLDIGI. The ARQ specification and the source code for FLARQ are GPL licensed. Other developers wishing to duplicate or expand upon the FLARQ ARQ implementation may freely do so.
FLARQ can be used with the following digital modem as the transport layer:
BPSK all baud rates
QPSK all baud rates
MFSK all baud rates
DOMINOEX 11 or faster (do not use FEC)
THOR all baud rates, 11 or faster recommended
MT63 - all baud rates, FLARQ timing should be increased to accommodate mt63 latency
Please note that Olivia IS NOT compatible with FLARQ transmissions. Olivia does not allow the transmission of the control codes required for FLARQ.
The main screen dialog for FLARQ is:
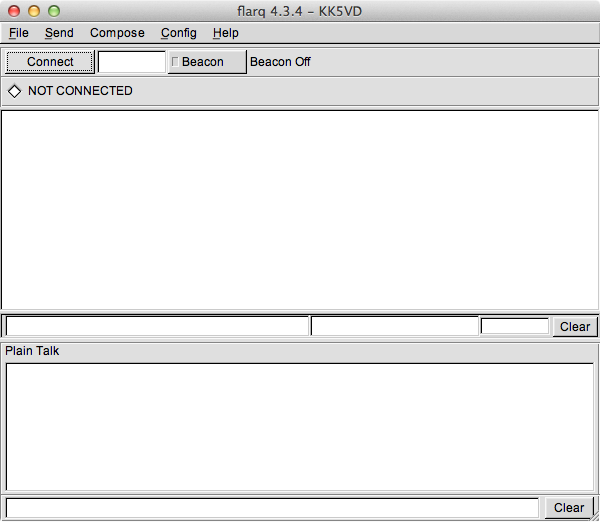
ARQ data is sent in data frames which clearly delineate from whom the data is being sent, it's purpose or type, the actual data, and a checksum value. The "Beacon" button will cause the transmission of the ARQ equivalent of a "CQ" frame which can be easily recognized by a receiving station. Upon receipt of the beacon frame a monitoring FLARQ will automatically insert the sending stations callsign into the edit box to the right of the "Connect" button. The receiving station can then press the "Connect" button and the connect process begins.
| Diamond Color | Indicator |
|---|---|
| WHITE | Not Connected |
| YELLOW | Connecting |
| GREEN | Connected - Receiving |
| RED | Connected - Transmitting |
| BLACK | Timed Out |
The state of the connection also appears in plain text to the right of the diamond indicator.
Pressing the "Beacon" button sends both the text and T/R commands to the modem program. The beacon will repeat with a wait time between transmissions set by the Beacon interval in seconds on the Configure dialog. During the silent period between beacon transmissions the Beacon button will show the count down timer. You can stop the beacon at any time it is in the count down mode by simply pressing that button or by pressing the Abort button. The default beacon interval is 60 seconds. The minimum is 15 seconds and the maximum 300 seconds. If you find that stations are having difficulty connecting to your beacon call then you probably need to increase the time between beacons to avoid ARQ collisions similar to doubling on voice. When FLARQ is in the Beacon mode the words BEACON ON, and the green light on the Beacon button will be lit.
The status bar at the bottom of the main dialog contains a status text message area to the left and a progress bar to the right. During a file transfer you will be notified of actions and also see the transfer percent completion in the progress bar.
Before using FLARQ (and upon its initial execution) you will have to enter some configuration parameters:
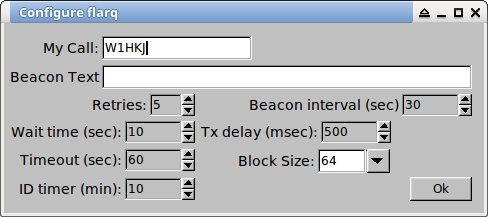
The highlighted field, "My Call" is the only one that you must fill in to start using the application. The folder locations for Text/Binary Files and also for the Mail Client files should all be OK as preconfigured for the operating system in use.
Read through the ARQ specification for additional detail. The Exponent is a 2^N factor which delineates the size of the text data block that is transmitted in a data frame. 2^5 is 32 and should be satisfactory for most s/n conditions. If you are experiencing many repeats you can lower the Exponent value. If the path between rx and tx stations is very good you could increase its value. FLARQ allows the following range of values:
| Exponent | Block size |
|---|---|
| 4 | 16 |
| 5 | 32 |
| 6 | 64 |
| 7 | 128 |
| 8 | 256 |
Retries specifies how many times a repeat request should be made before the link is declared DOWN.
Wait time is the time between retries.
Timeout is the time period during which NO RECEPTION of frames has occured before the link is declared DOWN.
The Tx delay is the time between the end of the Rx and the beginning of the Tx cycle for an ARQ exchange. One-half second should be more than sufficient for most transceivers. You might be able to lower the value for your rig. Older rigs may need the value increased.
Beacon text - will be transmitted with each beacon transmission.
Sylpheed Mail Client - Sylpheed stores the message files using numeric file names without extension. Check this box to insure that FLARQ stores the files in sequential numeric order without creating duplicates. This is primarily for Linux users. Windows users should leave this box unchecked unless they are using the Sylpheed Mail Client.
ID timer - ARQ receiving station does not broadcast MYCALL during a status frame. The ID timer counts down from a fixed time interval in seconds, default 10. If MYCALL has not been sent during the interval the receiving station will transmit an UNPROTO frame to self identify. This transmission will not interfere with the normal ARQ processing.
The normal connection process is that the station with traffic will request the connecting station to send a beacon. This tests the ability of the connecting station to forward. The station with traffic will then be the one to press the Connect button. The receiving station will see the beacon message displayed in the FLARQ text area and also see the beacon stations callsign appear in the callsign box. The connecting station presses the connect button and after a few automatic exchanges the diamond indicator to the right of the callsign turns green indicating that they are successfully connected. A connect may take a few retries if the transmission path s/n is marginal. During the connect process the diamond indicator will be yellow.
After the two stations are CONNECTED either operator may effect a file transfer. Who goes first may be negotiated using FLDIGI in a plain text mode or using the FLARQ "Plain Talk" facility, once connected. The FLDIGI T/R functions can be used in parallel with any ARQ transmissions. It might be best to conclude those negotiations before establishing the ARQ connection.
Either station may initiate a DISCONNECT process.
This is what the outgoing beacon will look like on FLDIGI:
The <soh> and <eot> are control codes that surround every ARQ frame. FLDIGI recognizes that it is connected to FLARQ and shows the control codes as ASCII named equivalents since they are not normally printable.
The text will appear very similar on the receiving end of the exchange.
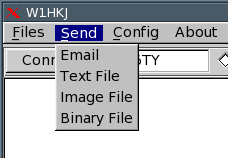
You may transfer several different file types:
If you select Text, Image or Binary file for transfer a regular file picker dialog is opened. You can navigate anywhere in the file system to pick a file. The default location for the files are unique in Windows and Linux/MacOSX. In Linux the default location is in $HOME/ARQsend and in Windows it is c:\NBEMS\ARQsend. Move files to that location to make finding the target file easy. Use the file manager or move the file using command line processing in a terminal window. Image and binary files will be converted into ASCII text files using base64 conversion. This basically is the same type of conversion that an email client would perform on an image or binary attachment. The file is encoded using base64 coding at the sending end and then decoded back to its original form at the receiving end. At the conclusion of a satisfactory ARQ transfer the two files will be identical, including name and size. The target directory for received files is $HOME/ARQrcvd in Linux, and c:\NBEMS\ARQrcvd in Windows. The receiving station opens the c:\NBEMS\Mail\ARQin folder and drags the incoming message placed there by FLARQ over to the Outlook Express email client, or just double-clicks on the .eml message to open it in the default email client. It is the reciprocal process from that which the sending station uses.
During the transfer the sending station transmits blocks of data. Each block has a header, data, checksum and trailing component. The receiving station acknowledges which blocks have been correctly received and which need retransmission. Missing blocks sometimes occur in the middle of the set of acknowledged blocks. The text in the FLARQ text window will only update as contiguous blocks are available. So you might see the update occur in what appears to be random intervals. As the sending and receiving stations go from receive-to-transmit-to-receive the diamond indicator will toggle from green to red and back to green.
FLARQ has a built-in email composer that creates files with a minimum of email overhead. It is a text only composer with no attachment or other niceties associated with a normal email client. It does produce very small email files which is a benefit when transmitting files over slower modem baud rates. Click on the "Compose" menu item. That will open the following dialog:
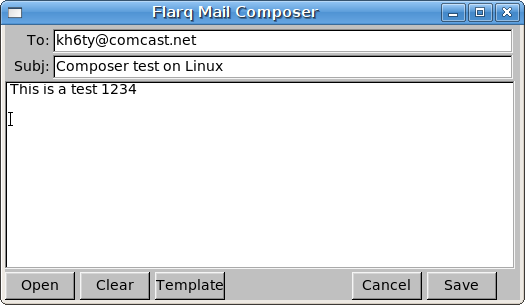
Enter the email address of the destination addressee, the subject and the email body text. Then press "Save" to save the file for later transmission.
You can create a template for later use and then save the template by pressing SHIFT while clicking on the Save button. Here is an example of a template in preparation:
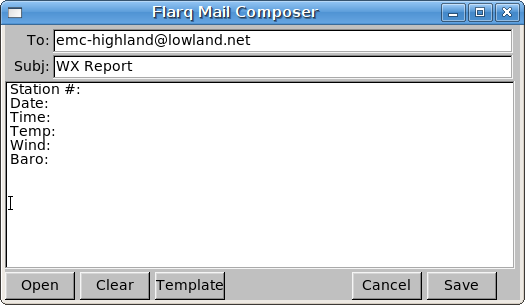
This file will be saved as "wxstatus.tpl". FLARQ recognizes the tpl extension as the template file. When you later click the Template button the new "wxstatus.tpl" template will be available to load and use in creating the wx status report. After opening a template you can either modify it and save as a new or overwrite the existing template, or you can save the filled-in template as a regular file for subsequent transmission.
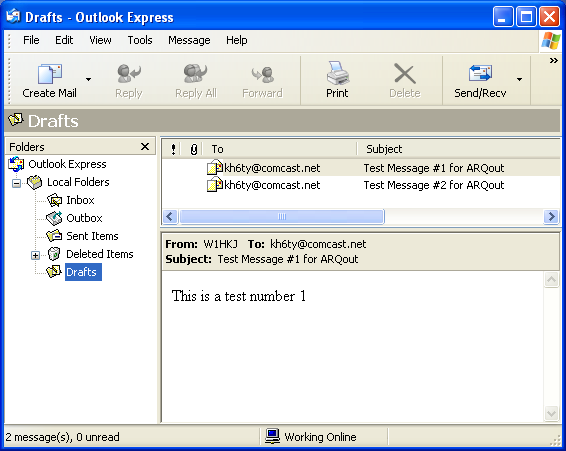
You can use Outlook Express for the email client to create outgoing ARQ traffic. Just remember that you should create all email traffic as ASCII text and not HTML text to reduce the size of the message body. You are going to send this via an RF link and not over the internet with a high speed connection.
Create your email just as you would for transfer over the internet and then save it in the Drafts folder. In Outlook Express, click Create Email and use the format, name@phonenumber, such as information @8005551212, for the address if it is to be delivered by phone, and is not an email. Save each message in the Drafts folder by clicking File, and then Save. Exit the composition window. Open the ARQout folder (located at c:\NBEMS\Mail\ARQout) on the desktop along with Outlook Express as shown below. Then drag the message from the "To ... Subject" area of Outlook Express and drop it on the ARQout folder. This places them in a folder that FLARQ can locate.

When you select the FLARQ menu item "Send / Email" a dialog will open that shows the contents of the messages that are in the ARQout folder:
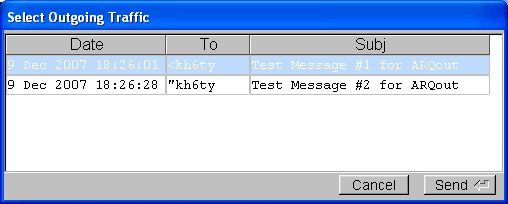
Multiple email entries would appear on separate lines with scroll bars as appropriate. You highlight the desired file and then press "Send" or the Enter key to commence the file transfer. The email may contain attachments (which may be images) or be just plain text. Remember that this is a fairly slow transfer process so small is beautiful. If the email has images then it will be in html and base-64 format. That adds a lot of overhead to the email. "Cancel" aborts the email transfer process. After a successful transfer from sending to receiving station the email is automatically moved from the ARQout to the ARQsent folder. If you are using Outlook Express you can open the c:\NBEMS\Mail\ARQsent folder the same way that the ARQout folder can be opened. At the receiving end the email will be placed in the Sylpheed ARQin folder. Sylpheed does not need to be executing for this to occur at either end.
FLARQ has been optimally designed to interoperate with Sylpheed as its email client for emergency communications of email traffic. When you install Sylpheed you will be asked to choose a default directory for the mail store. On Linux/MacOSX this should be the default $HOME/Mail. On Windows you should choose c:\NBEMS\Mail. Three additional folders are used for transferring files between the FLARQ application and Sylpheed. These are:
You can create these folders from within the Sylpheed application.
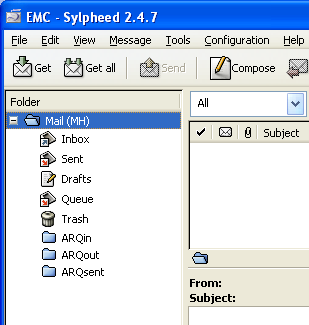
The above image shows the folders already in place. If they were not present they could be created by right clicking on the "Mailbox (MH)" icon and selecting "Create new folder". Name each new folder as specified above and shown in the image. These folders are required for FLARQ to be able to work with the Sylpheed email messages. Each message in Sylpheed is a separate file. These are usually numbered sequentially in each of the Sylpheed folders. FLARQ manages the correct sequential naming of files as they are transferred in, out and moved between these three folders. If you run the FLARQ application before Sylpheed then the c:\NBEMS\Mail and the c:\NBEMS\Mail\ARQin, ARQout, and ARQsent folders will be created by that application and will appear in the Sylpheed folder system.
To create a new email traffic you press the "Compose" button. Fill out the email as usual and then press the "Draft" button from within the composer. The new message for transfer via FLARQ is now in the Drafts folder shown above. Open that folder by clicking on it. Select the desired draft message and drag and drop in onto the ARQout folder icon. That's it! The message is now ready for FLARQ to perform the ARQ transfer.
Upon completion of the transfer FLARQ will move the message to the ARQsent folder. Sylpheed will not immediately recognize that the change has occured. That is easily accomplished by either changing to another folder and then back again or by right clicking on the ARQout (or ARQin, or ARQsent) folder icon and selecting "Update summary". Sylpheed will re-read the folder contents and adjust it's views accordingly.
Incoming traffic will be placed in the ARQin folder. You may have to refresh the folder as described above.
FLARQ can find and parse the newly created email document that has been moved or copied to the ARQout folder. If you select to send email a picker dialog will appear that lists all of the out going email traffic that is contained in the Sylpheed ARQout folder.
If you use an email client other than Sylpheed or Outlook Express you can transfer emails as above. Just be sure that the emails have file names with the extension "eml" as in "mytest_message.eml".
The transmission may be aborted by either the sending or the receiving station at any time during the file transfer. When Connected and transferring a file, the Connect button is re-labeled Abort. Since data is sent in multiple blocks the actual abort will take place at the conclusion of the current group transmission. Abort will cause the transfer to be interrupted. The connection will be maintained and a new transfer can be initiated if required.
After a connection is established the two stations can exchange text using the "Plain Talk" entry control at the bottom of the main dialog. Enter up to 80 characters and then press the Enter key to transmit the text. This text is sent UNPROTO, which means that NO repeat request will be made. The block is sent without any acknowledgement from the receiving station. This is not an ACK/NACK system, but meant only as a way of allowing quick operator to operator exchanges without having to disconnect and use the digital modem program keyboard entry. "Plain Talk"can be interspersed with normal ARQ file transfer blocks.