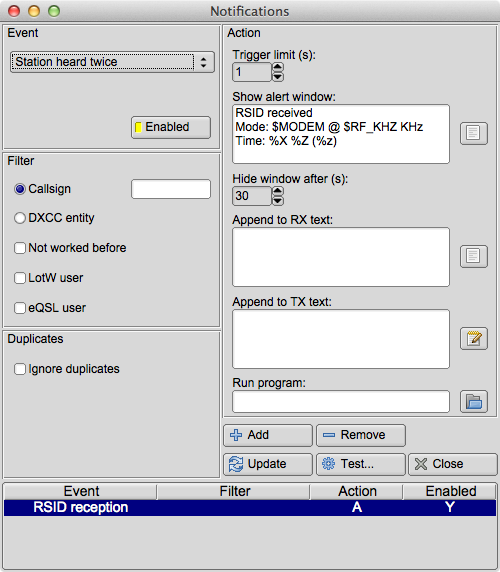
This dialog available is used to specify search patterns and alerts that are triggered when the decoded Rx text matches those patterns. This only happens when the Spot button on the main window is activated, as with the PSK Reporter client.
First, here's how it works in general. You specify a regular expression (RE) that contains one or more parenthesised capturing groups. Fldigi's spotter matches it against the incoming text (main window or Signal Browser, so it works with both PSK and RTTY) and, if the RE matches, it performs one or more of the following:
Displays an alert window with some text and a "go to that frequency" button.
Enters some arbitrary text into the Transmit pane. The text may contain <MACRO>s and these will be expanded as usual.
Runs a program (Unix/Linux only for now).
The text described by the capturing group(s) can be used in all of the above. There is an example of this at the end of this page.
Not everyone is at ease in writing regular expressions for the notifier to act upon. So a few "canned" searches are coded into the notifier and are selected from the event chooser at the upper left of the dialog.
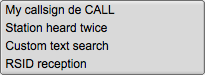
- My Callsign de CALL. Can be used to alert you when CALL calls you.
- Station heard twice. Pretty much the same search that the PSK reporter client does.
- Custom text search. This reveals an input field where you type your own RE.
- RSID reception.
Both (1) and (2) are special cases of (3), but with some extra processing available because in each case fldigi knows what it has just found.
The Filter pane is available for the first two event types only, i.e. not the custom text search. In this pane you can specify some properties that the spotted callsign must have for the actions to take place:
a) The Callsign radio button reveals a text field when selected. If you enter something in that field, the event will be accepted only if the text matches the spotted callsign (I may change this to a RE match).
b) The "DXCC entity" radio button reveals a button that brings up a list of DXCC entities. Select entities by clicking or dragging. If you select any at all, the spotted callsign's country will have to be one of those or the event will be ignored. Having no entities selected is the same as selecting all of them, i.e. any country, but is a more efficient.
The entity list can be sorted by clicking on the row headers, and there is a right click context menu that can (de)select by continent and CQ zone. The buttons and search fields at the bottom behave as you'd expect.
The list is also available with the menu item "View / Countries" in the main window.
You need cty.dat for all this to work
c) The "Not worked before" check button asserts that, if you have selected (a) above, the callsign must not be in your logbook. Same with (b), but now you must not have had any QSOs with stations from that country in the log.
d) The "LotW user" and "eQSL user" buttons specify that the callsign must be on one of these two lists (the documentation explains where to get the user lists from and where to put the files).
The Action pane is where you choose how fldigi will alert you when an event matches the filter bits.
a) The text in the "Show alert text" box, if not empty, is shown in a pop-up window. The alert window has a timer and dismisses itself after a configurable time interval (the "Hide after" control). The user can click anywhere inside the window to stop the timer.
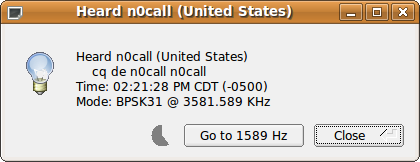
The button next to the text box enters the default alert text for the event you have selected. There are a few variables that are substituted when the window is displayed:
For all three event types: $MODEM (modem name), $DF_HZ (dial frequency), $RF_HZ (actual receive frequency), $RF_KHZ, $AF_HZ (modem audio frequency)
For the 1st event type (my call): $CALLSIGN, $TEXT (all matched text).
For the 2nd event type (station): $CALLSIGN, $TEXT, $COUNTRY.
For the 3rd event type (custom): you're on your own here, but fldigi will helpfully list all the possible substrings found in your RE.
The whole text is passed through strftime(3) so you can customize the date. Here's a reference for the % characters:
http://www.opengroup.org/onlinepubs/007908799/xsh/strftime.html
b) The "Append to TX text" box – self explanatory. The same variable substitutions apply, as well as macro expansion. The nearby button shows the macro editor. The appended rx text is clickable. Clicking it will move the waterfall frequency (and transceiver if under CAT) to the detected signal and change to the indicated mode.

c) The "Run program" field and browse button are only available on Unix systems. Field contents are passed to the shell ("/bin/sh -c"), as with system(3). No variable or \backref substitution is done for this field, but all substrings are exported as environment variables, such as FLDIGI_NOTIFY_STR_1. The usual <EXEC> macro variables are also there and your ~/.fldigi/scripts directory will be in the shell's path. Try it out with a test script for the full list of variables.
d) The trigger limit box specifies how much time must pass between subsequent invocations of whatever actions you have specified.
The Duplicates pane has a check button that displays the rest of that group when checked. If you enable this, fldigi will remember what it has seen and ignore the event if it is a duplicate. The other controls in that pane determine what constitutes a duplicate:
a) The menu tells fldigi what to look at. For the first two event types, the menu will display "Callsign", and for the custom search it will contain a list of \X references for the RE.
b) The time box is also essential; it determines how close the events must be in time to be considered duplicates.
c) The Band and Mode check boxes further restrict the comparison.
An example:
You are looking at callsigns, with a dup time of 600s, and both Band and Mode checked. A callsign is found once and fldigi alerts you. Now if this callsign is spotted again, less than 600s later and in the same band and mode, it is a duplicate and will be ignored. With (say) Band and Mode unchecked, it is a duplicate regardless of frequency band or mode as long as it's heard before the 600s elapse.
Three of the four buttons at the bottom left are pretty much self-explanatory. Add to the list an event you have just specified, or select an event from the list and Remove it, or change some of its parameters and Update it.
The Test... button allows you to test an event with some text of your choice. This is particularly useful with the custom text search, as it's too easy to enter a RE that will never match. The dialog will show you the default test string for the two fixed event types. Careful: the "Station heard twice" event type expects a non-alphanumeric character at the end of its input. The default test string has a space at the end.
If nothing happens, it may be because you have not specified any actions, or because the event's filter does not match, or because the trigger limit or dup handling are preventing the actions from happening. In the latter case, updating an event will reset its dup data. But it's better to add the dup and trigger limits at the end, after you've tested the event.
The list at the bottom of the window shows the events you have added. All contents are saved in the file ~/.fldigi/notify.prefs.
The list has a context menu for quick access to Update, Remove, and Toggle. The first two have the same effect as clicking on the button of the same name.
The Toggle item lets you flip the "Enabled" status of an event: this is like selecting an event, clicking on the "Enabled" button in the Event pane to (de)activate it, and then clicking "Update". Disabled events are kept on the list but are not registered with the spotter and so they are never triggered.
If you disable all the events and there is nothing else using the spotter (e.g. PSK Reporter), the Spot button will disappear from the main window.
A 2nd example:
Here's how to do the "my call" event using the custom text search:
a) Select "Custom text search" in the event pane
b) In the RE box, enter (without the quotes or leading white space):
"<YOUR_CALL>.+de[[:space:]]+([[:alnum:]]?[[:alpha:]/]+[[:digit:]]+[[:alnum:]/]+)"
and remember to replace <YOUR_CALL> with your callsign.
c) In the actions pane you can now use \0 for the whole text matched by the above RE, and \1 for the first capturing group (the callsign).
d) Select "\1" in the duplicates menu if you want dup filtering.
e) Test with "<YOUR_CALL> de <SOME_OTHER_CALL>" and you should see the alert window with the text you specified.
Addional examples:
Add a "My callsign de CALL" event with a script that will do something to get your attention when someone calls you.
Add a "Station heard twice" with the DXCC filter and the "Not worked
before" option. Also set the LotW or eQSL options if desired.
Add a "Station heard twice" with no callsign/dxcc/etc. filter but with duplicate filtering. Write a script that sends the data to a DX cluster or similar.
Here is a simple Perl script that uses notify-send (in the package libnotify-bin on Debian) to display desktop notification "bubbles". A better version would use the libnotify bindings for Perl or Python directly.
-----------------------------snip
#!/usr/bin/perl
exec("notify-send", "-t", "5000", "-i", "/usr/share/pixmaps/fldigi.xpm",
     "Heard " . $ENV{"FLDIGI_NOTIFY_CALLSIGN"} . " ($ENV{FLDIGI_NOTIFY_COUNTRY})",
     $ENV{"FLDIGI_NOTIFY_STR_0"});
snip----------------------------