Table of Contents
Thor is a new forward error correcting incremental frequency shift keyed communications mode. It was developed specifically to meet the needs of ARQ transfers in the HF spectrum. It is particularly well suited under conditions of atmospheric static noise. Thor borrows from two current modem technologies, MFSK and DominoEX.
Thor emits a distinctive double rising tone sequence at the beginning of each transmission. It is used to flush the receive decoder and also provides a visual and audible clue to its being used.
The modem code for Thor uses a wide band multiple frequency detector that can lock on and detect the incoming signal even when badly mistuned. Frequency domain oversampling is used to allow proper tone detection without the need for AFC. The AFC control does not alter the decoder in any way.
The fldigi implementation of the Thor modem includes the ability to send and receive images and avatars. The default avatar is the "Tux" logo.
Sending, receiving and saving avatars is discussed in the avatar section.
The waterfall and digiscope will appear as:

The text displayed in the status area is the secondary text being sent by the transmitting station. When the keyboard buffer is empty the Thor modem transmits text from the secondary text buffer. Your secondary text buffer can be edited on the Thor configuration tab.
The digiscope display is similar to the DominoEX display and represents the tone pairs moving through the tone filters. You can also use an alternate digiscope display (left click on the digiscope display area).
In this display mode the red line represents the center of the multiple tone bins that are in the detector. The dots will be blurry if the AFC is not locked on and become very distinct when AFC lock has been achieved. The tone dots will move from bottom to top (opposite the direction of the waterfall).
Thor Data Modes
| MODE | Tone Range | BW (-26 dB) | # Tones | SR | baud | char/sec | ~wpm |
|---|---|---|---|---|---|---|---|
| THOR-MICRO | 36 | 53 | 18 | 8000 | 1.95 | 0.6 | 7 |
| THOR-4 | 70 | 105 | 18 | 8000 | 3.9 | 1.1 | 15 |
| THOR-8 | 140 | 210 | 18 | 8000 | 7.82 | 2.2 | 30 |
| THOR-16 | 281 | 420 | 18 | 8000 | 15.625 | 4.5 | 60 |
| THOR-25x4 | 1800 | 2022 | 4x18 | 8000 | 25 | 7.2 | 100 |
| THOR-50x1 | 900 | 1345 | 18 | 8000 | 50 | 14.5 | 188 |
| THOR-50x2 | 1800 | 2245 | 2x18 | 8000 | 50 | 14.5 | 188 |
| THOR-100 | 1440 | 2430 | 18 | 8000 | 100 | 28.6 | 372 |
| THOR-32 | 563 | 840 | 18 | 8000 | 31.25 | 9 | 120 |
| THOR-5 | 194 | 252 | 18 | 11025 | 5.38 | 1.55 | 20 |
| THOR-11 | 194 | 290 | 18 | 11025 | 10.77 | 3.1 | 40 |
| THOR-22 | 388 | 580 | 18 | 11025 | 21.53 | 6.2 | 80 |
| THOR-44 | 775 | 1160 | 18 | 11025 | 43.1 | 12.3 | 160 |
| THOR-56 | 993 | 1485 | 18 | 16000 | 55.2 | 16 | 210 |
Thor Image Mode
fldigi-thor can send and receive images and avatars when the modem is set to 11, 16 or 22 baud.
Small digital images are selected from those stored on the disk. The image transmission is similar to but not compatible with the IFKP image mode.
Thor images are always transmitted in a fixed width to height ratio.
The W x H format is not limited to a single ratio, nor is it limited to just color, or just gray scale. Thor transmits the image in Blue-Green-Red order. The thor image bandwidth is the same as the signal bandwidth for for Thor mode in use.
The start of the picture is signalled digitally, and the receiver simply captures data continuously for W lines of H pixels, as requested, resulting in a WxH pixel image, then reception stops.
A brief period of silence, followed by a sync signal will be transmitted at the beginning of each image or avatar. The sync signal is used to align the start of the received image. This is the equivalent of a vertical sync signal in an analog television signal. There is no equivalent of horizontal sync, therefore there is no risk of the picture tearing due to timing changes, or breaking up during selective fades. All that happens is that the image may noise up momentarily, but will stay correctly aligned.
Image Format
The images are approximately in 4:3 or 3:4 aspect ratio. thor images can be received by any thor capable decoder.
Available image aspect ratios / formats include:
- 59x74 color
- 160x120 color
- 320x240 color
- 640x480 grey scale
- 640x480 color
- 240x300 color
- 240x300 grey scale
- 120x150 color
- 120x150 grey scale
These formats correspond roughly to a portrait (3x4) and landscape (4x3) photo. fldigi will scale any computer stored image to the target image. You should edit the images off line to be at least close to the 3x4 or 4x3 ratio. That will prevent the fldigi loader from distorting the loaded image.
The image mode sampling rate is the same as the base baud samplerate:
- Thor-11 11025 samples/sec
- Thor-16 8000 sampels/sec
- Thor-22 11025 sampels/sec
Each pixel consists of 10 samples, and there are P pixels/line. Therefore the line period is 10 x P/sample-rate seconds, or the line rate sample-rate/(10 x P) lines/sec. In colour, each line is sent three times, in Red-Green-Blue (RGB) order.
The is a single sync signal sent at the beginning of each image is a tone placed 186 Hz below the center frequency. The sync signal is 20 symbol lengths of silence followed by 20 symbol lengths of the tone.
If the sound cards in the transmitting and receiving computers differ markedly in sample rate, the resulting picture can be skewed. A small timing difference is enough to cause a noticeable slant in the picture. This is easily fixed after reception using the Slant control. High quality sound cards should be better than 5ppm, and result in barely noticeable slant, but some cheaper computer built-in sound modules may be rather worse. If you plan to send thor images you should calibrate your sound card to WWV. There should be no slant if both the transmit and receive sound cards are calibrated to WWV
Transmit Image
Transmitting an image in thor is initiated by selecting the "Send image" menu item from the pop up Tx menu. Right click on the Tx panel
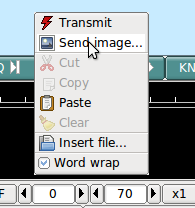
This selection opens up the Send Image dialog

shown with a 160x120 color image loaded and ready to transmit.
Transmission begins when you press the "Xmt" button. fldigi will insert the text preamble and immediately begin the image transmission. fldigi remains in transmit mode when the image transmission is completed and the deadman timer is started.
There is an alternate way of sending an image, but one which only transmits a color image with no provision for slant correction. This may be more convenient for sharing images when you do not need the additional utility of the image dialog.
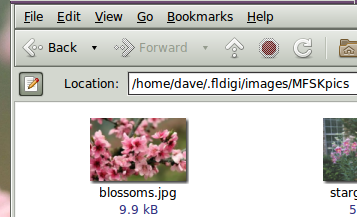
Open a file folder to the location of your image files that are suitable for MFSK transmission. These images should be constrained to be 240 x 200 or less for reasonable transmit times. Optionally prepare fldigi for the MFSK image transmission by entering some suitable text to precede the transmission.
You may be sending the image, blossoms.jpg, for example.
One might enter:

Then drag and drop the the image file from the files folder to the transmit text panel in fldigi. The program will automatically resize the image to the nearest scale-aspect ratio less than or equal to the actual image size.
The TX panel text will then change to

The ^! is the character sequence used by the fldigi TX parser to indicate that there is a pending execution command. In this case it is to transmit the blossoms.jpg file.
Add some suitable ending text and the sequence ^r to the next line and then press the T/R button (if not already transmitting). At the end of the image the TX parser will find the ^r and return the program to the receive mode.
The Rx panel will echo the transmitted data:
The transmit progress dialog will close at the conclusion of the image transmission.
Receive Image
Reception is completely automatic. The decoder will identify the picture start, and record the picture. In doing so, it automatically opens a separate "thor Rx Image" dialog.
Demodulation uses a phase detection algorithm based on quadrature demodulation using the current and previous samples. All the samples are converted to pixels and stored, but only the average over every 10 samples is displayed.
The raw image is stored in a temporary buffer of expanded size, which allows fine adjustment of the slant and phase to be made before the image is sampled and displayed.
If the transmitting station goes off the air or reception is lost during recording of a picture, the recording will continue until the necessary number of samples has been made, then reception stops.
The Rx Image dialog controls from left to right are:
- Reset: clears all rx data
- Phase adjustment: moves image left and right
- Slant adjustment: slews image diagonally
- Save: saves the image to the fldigi image folder with a date-time stamped file name
- Close: closes the image dialog
Image phase and slant should not be adjusted before the picture reception has finished, as then only part of the image will be corrected.
Avatars
Avatar images are 59 x 74 (width x height) color images that are associated with a call sign. The avatar images are stored in the folder
C:\Documents and Settings\<user>\fldigi.files\avatars\
C:\Users\<user>\fldigi.files\avatars\
/home/<user>/.fldigi/avatars/
as "png" images.
You should prepare an image file for your own call sign, in lower case. For example
/home/dave/.fldigi/avatars/w1hkj.png
in a 4x5 aspect ratio, preferably in the 59x74 format, but any larger 4x5 image can be used. fldigi will scale the image to 59x74 when it is read from the file.
You can send your avatar very simply by right clicking on the thor avatar.
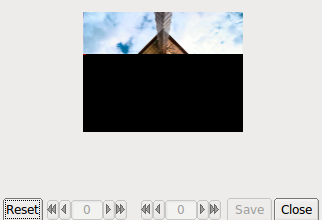
If you receive an avatar from another station it will automatically be displayed in the avatar box. You should have previously entered the call sign of the other station in the Call logging control. Left clicking on the avatar will then save the image in the avatars folder with the appropriate callsign. The correct avatar will then be displayed the next time you enter that call sign in the Call logging control. This is an example of a received avatar with timing misalignment.
The received image may be misaligned left or right in the image box. This is caused by an error in the start timing of the reception. You can realign the image using a combination of SHIFT, CONTROL and LEFT/RIGHT mouse clicks on the image. Be careful to use either the SHIFT or CONTROL in combination with the mouse button. Mouse left and right click without the SHIFT/CONTROL will cause either a save or an own avatar transmit to occur.
CONTROL LEFT click  - move image left by 1 pixel
SHIFT   LEFT click  - move image left by 5 pixels

CONTROL RIGHT click - move image right by 1 pixel
SHIFT   RIGHT click - move image right by 5 pixels
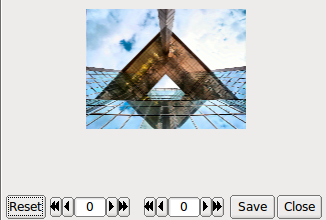
The same image after alignment.
You will probably need to manage the avatar images using your OS file explorer. Easy access to the image folder is obtained by the menu item File/Folders.
The avatar image format is identical to the thor image 59x74 format. If you receive and save a 59x74 image you can always rename the saved image (date-time-stamped) to a "callsign.png" in the avatar folder.