 |
FLRig Users Manual
1.4.8
|
|
FLRig Users Manual
1.4.8
|
Press the transceiver MENU button then the on screen items: Set , then Connectors.
Make sure the settings for these items are as follows:
Once the above are set then touch the CI-V line on screen to get a list of items to set especially for CAT control. Many of these are ok at default, but verify the ones listed below:
You should have already installed the driver for the built-in sound card in the 7300.
Connect the transceiver to the computer with a USB A-Male to B-Male cable and turn on the radio.
For Windows flrig will install to it's own folders and should be installed in the normal application folder where other applications are installed.
Putting them in other folders can causes permissions issues sometimes on Windows 10. For Mac and Linux install them as you would any other application.
With the radio on and the USB cable connected and no other communications program running, Start flrig.
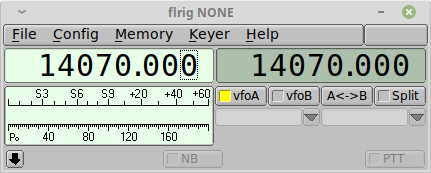
It will come up with just a basic display.
Go to the menu Config/Setup/Transceiver.
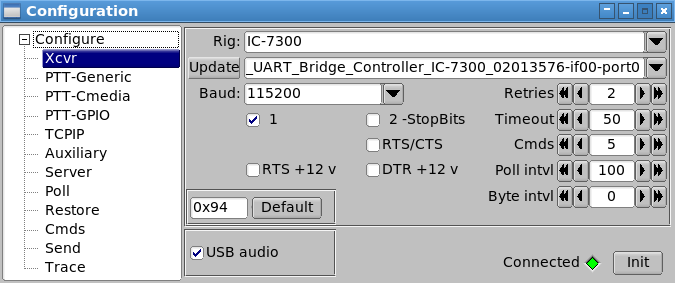
Choose the 7300 from the Rig dropdown list. That will select the default settings which will be good for starters. Note: The RTS +12v and DTR +12v boxes do not need to be selected.
Select the Serial Port to use
If the device does not appear in the list then click the SerPort button to repopulate the list. It if still isn't in the list then the driver is not loading for some reason like the radio is not on or connected or the driver has not been installed properly so that needs to be rectified before going on. If you're using MacOS High Sierra or a later version of MacOS you may need to authorize the driver install in Security & Privacy setup in System Preferences after runing the install program. There will be a message on the General page if it has been blocked. Windows
Open the device manager and determine to which com port the serial driver from Silcon Labs is assigned and choose that from the drop down list. Verify that the Baud rate in flrig matches the baud rate selected in the rig. It's better to choose a fixed baud rate than Auto. Now, click the Init button. It should go from red to black lettering. If it does not go to black lettering then verify all of the above again, especially baud rate.
Select the restore tab
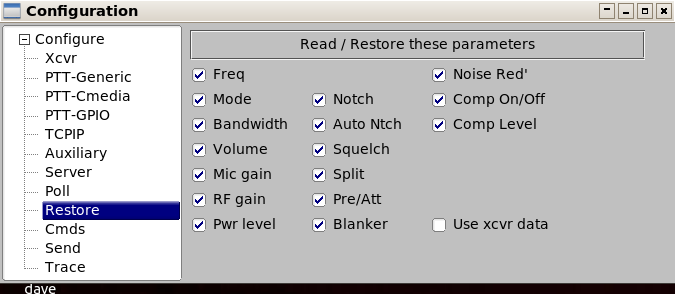
and choose whether you want flrig to save and restore all the radio’s parameters on startup and exit or whether you want it to open with the same settings as the rig is currently using. If Use xcvr data is checked flrig will start up with the same settings as the rig currently is using.
\subsetion ss7300-poll Select the Poll tab
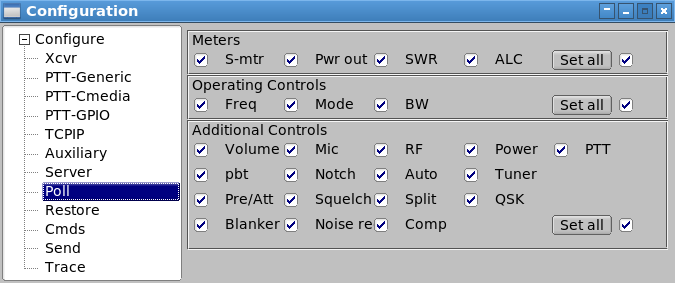
and select to poll all of the parameters. You can play with these values later if you wish. The larger the number the slower the response time to button pushes etc, but also the less load on the system so there is a balance. A very fast machine can use all ones, but there is normally no need to add the additional load to your system for that.
Flrig now should have control of the rig so changing frequency in flrig will changed the frequency on the rig and visa versa. The buttons and sliders should do as they are labeled.
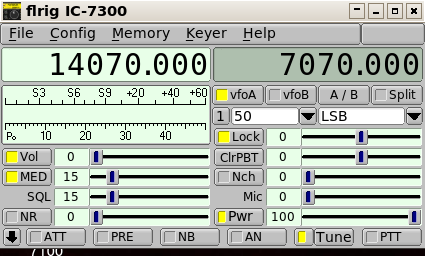
I would recommend before you move on that you go to the Config/UI menu and select Tooltips. They are a great help to the new user to figure out what each control does as not all are labeled. You can choose 4 different UI’s from the narrow one with small sliders (I use this one – see above screen shot of flrig), to a narrow one with large sliders, to a wide version or a touch version. Now close flrig and restart it to be sure all is well . Everything should be working and you should be able to change frequency on the radio and flrig should follow.